Invite guests using the Invite link from the menu bar
Import email address into Invite from a CSV file
My CSV file won't import
Invite guests using the Invite link from the menu bar
- Click Invite in the dark blue bar
- In the first box, fill in the email addresses (separated by commas) of the people you would like to invite.
- In the second box, write a note encouraging the invitees to come.
- See what the email will look like by clicking the Preview link.
- Check Email me when my guests register if you would like to be notified when any of these people register.
- Click Send Invitations.
If you need to come back to the Invite screen to finish later, click the Save Draft button. Note: Your draft is saved and connected to your IP address until you either send or cancel your draft. If you need to save the draft for other invitations, you should save the draft in a file outside of Ministry Sync.
Import email address into Invite from a CSV file.
Exports from Export Data or Search in Ministry Sync are automatically a CSV file. Follow these links for instructions to create a CSV file from Hotmail, Yahoo, Gmail contacts. Click here for instructions from about.com on exporting your Outlook Contacts to CSV.
Before Importing, be sure that:
- Make sure all the emails you want to import are in one column.
- Make sure the first row is a Header Title like "Email Address". They need to be a perfect match. Case and spacing matters.
- Make sure there are no spaces before or after the name of your header or any of the email addresses.
- Make sure that your spreadsheet only has one sheet.
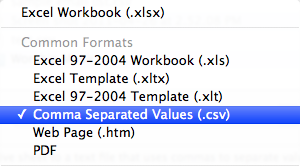
- If you are using Excel, be sure to do a "Save As..." and save it as a "Comma Separated Values (CSV) File".

- Once you have your CSV file, click Invite.
- Click the Import Emails from CSV link.

- If the name of the header you are importing is not "Email Address", change it to what it is called in the CSV file. Case and spacing matter here.
- Search for your Excel file by clicking the Browse button.
- Navigate to your Excel file, and click Open.
- Click the Upload button to import the addresses.
- The page will refresh with a list of emails separated by commas.

My CSV file won't import
There are four common problems that will keep your CSV file from importing into the Invite tool.
- When you create your CSV file, make sure you click File>Save As and choose the CSV format in Excel. Changing the extension on the file name is not the same as saving the file as a CSV file.
- Make sure the name of the column or header that contains the email addresses in the file exactly matches the Header Name to Import field. Spaces and capitalization do matter.

- Make sure there are no spaces preceding or trailing the name of the header or the email addresses in your file. Any extra spaces will prevent the file from uploading correctly.
- Make sure that your worksheet only contains one sheet. If necessary, copy the worksheet to its own file.
If you continue to have problems uploading your file, you can copy and paste the email addresses into the top box.
- Open your .CSV file with a plain text editor, like Notepad or Text Edit.
- This will open the file as list of email addresses separated by commas
- Simply copy the list and paste it into the box that says, "Enter their emails below, separated by commas."
Other articles you might enjoy:
Invite participants and sponsors from a past event
Invitation banner looks too small
Can I change the "From" email on my Invitations?
Updated 7/15/16